ESP-12でraspi2のシリアルコンソールをWiFi化

前から、興味があった透過型のUARTーWiFIブリッジ的に使う方法をあれこれ試していました。

結論から言えば、出来ました。

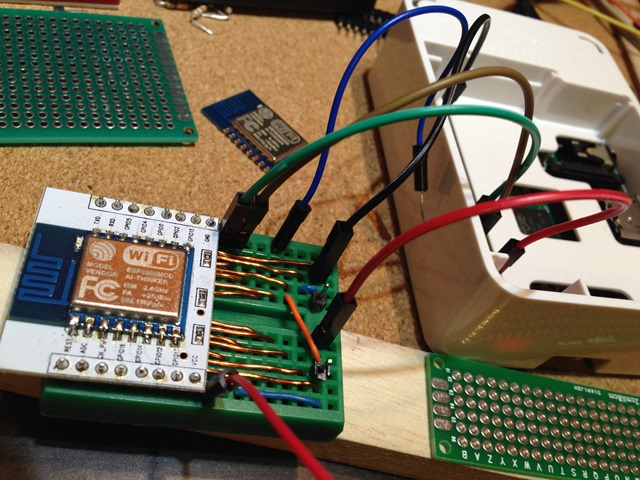
こんな感じで、電源はRasPi2 から取っていますので蓋の中に収められそうです。

uart-wifi

ESP-12 に収めるプログラムは、なんとサンプルスケッチの中にありました。WiFiTelnetToSerial です。

/*
WiFiTelnetToSerial - Example Transparent UART to Telnet Server for esp8266

Copyright (c) 2015 Hristo Gochkov. All rights reserved. This file is part of the ESP8266WiFi library for Arduino environment.

This library is free software; you can redistribute it and/or modify it under the terms of the GNU Lesser General Public License as published by the Free Software Foundation; either version 2.1 of the License, or (at your option) any later version.

This library is distributed in the hope that it will be useful, but WITHOUT ANY WARRANTY; without even the implied warranty of MERCHANTABILITY or FITNESS FOR A PARTICULAR PURPOSE. See the GNU Lesser General Public License for more details.

You should have received a copy of the GNU Lesser General Public License along with this library; if not, write to the Free Software Foundation, Inc., 51 Franklin St, Fifth Floor, Boston, MA 02110-1301 USA */

include <ESP8266WiFi.h>

//how many clients should be able to telnet to this ESP8266

define MAX_SRV_CLIENTS 1

const char ssid = "yyyyy"; const char password = "xxxxx";

WiFiServer server(23); WiFiClient serverClients[MAX_SRV_CLIENTS];

void setup() { Serial1.begin(115200); WiFi.begin(ssid, password); Serial1.print("\nConnecting to "); Serial1.println(ssid); uint8_t i = 0; while (WiFi.status() != WL_CONNECTED && i++ < 20) delay(500); if(i == 21){ Serial1.print("Could not connect to"); Serial1.println(ssid); while(1) delay(500); } //start UART and the server Serial.begin(115200); server.begin(); server.setNoDelay(true);

Serial1.print("Ready! Use 'telnet "); Serial1.print(WiFi.localIP()); Serial1.println(" 23' to connect"); }

void loop() { uint8_t i; //check if there are any new clients if (server.hasClient()){ for(i = 0; i < MAX_SRV_CLIENTS; i++){ //find free/disconnected spot if (!serverClients[i] || !serverClients[i].connected()){ if(serverClients[i]) serverClients[i].stop(); serverClients[i] = server.available(); Serial1.print("New client: "); Serial1.print(i); continue; } } //no free/disconnected spot so reject WiFiClient serverClient = server.available(); serverClient.stop(); } //check clients for data for(i = 0; i < MAX_SRV_CLIENTS; i++){ if (serverClients[i] && serverClients[i].connected()){ if(serverClients[i].available()){ //get data from the telnet client and push it to the UART while(serverClients[i].available()) Serial.write(serverClients[i].read()); } } } //check UART for data if(Serial.available()){ size_t len = Serial.available(); uint8_t sbuf[len]; Serial.readBytes(sbuf, len); //push UART data to all connected telnet clients for(i = 0; i < MAX_SRV_CLIENTS; i++){ if (serverClients[i] && serverClients[i].connected()){ serverClients[i].write(sbuf, len); delay(1); } } } }

ArduinoIDE へ、ESP8266 Arduino Core の最新(ver. 1.6.5-1044-g170995a, built on Aug 10, 2015)を収めました。

SDK1.3 が収まったものは、以下のStaging versionから入れました。

NFS Boot でタイムマシーンから復元

osx 上の nfs で RasPi をブートしているので、タイムマシンからインストール直後に復元できるかやってみました。


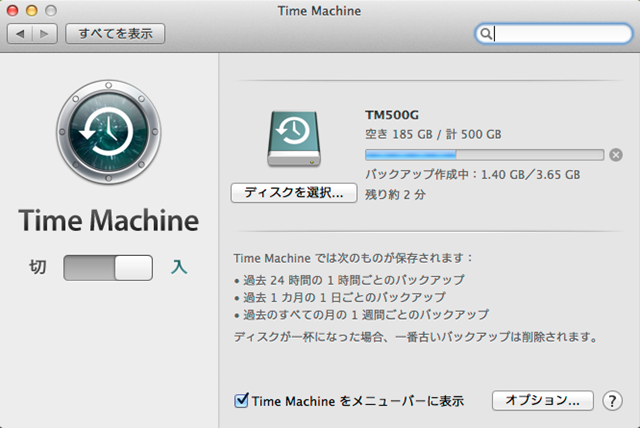
まず、インストール直後、pi の電源を落とした状態で、タイムマシーンでバックアップを取得。対象は、nfs 直下のところだけにしています。

Time_Machine

現在の、パッケージ数の状態

[root@pi modules 07/26 06:19:54]# dpkg -l | wc -l
875
[root@pi modules 07/26 06:19:57]# 

nginx でも入れてみます。

[root@pi ~ 07/26 07:33:55]# dpkg -l | wc -l
878
[root@pi ~ 07/26 07:33:56]# 

パッケージ数が増えました。

で、設定やら、バージョンやらつついた後に、やっぱりやーめた(よくある事)、ということで初期状態に戻します。


pi はあらかじめ、シャットダウンしておきます。

タイムマシーンに入ります。

1

dev を除外して、すべて選択。

2

で、ブート。

[root@pi / 07/26 08:21:25]# dpkg -l | wc -l
875
[root@pi / 07/26 08:21:29]# 

便利ー!

FreeNAS + iSCSIやNFS 環境 でもスナップショットを使えばできるとは思いますが、この手軽さにはかないません。

オンラインバックアップが正常に動作するかは、sync している状態次第だと思うので、どうなるかわかりませんが。nfs のオプションにsync つけておけばいいのかしらね。


とりあえず、部屋が暑くてもうPCからは離脱。満喫か、温泉でも行ってきますかねー。空が夏!

NFS Boot に成功した

とりあえず、NFS Boot は本当にできるのか試してみました。結果、できました。
実際やってみると、いろいろとはまるところがありましたが、おおむね以下の手順。忘れないうちにメモしておきます。

▼環境

NFS Server・・・・osx 10.9.5

Boot OS・・・・・ 2015-05-05-raspbian-wheezy


▼操作の流れ

・NFS サーバでシェアする用意

・arm 用の img のルートファイルシステムを NFS へコピー(大体は第2パーティションにあり。Fedora とは3番目)

・SDCard の FATフォーマットの boot の cmdline.txt へ nfs boot する設定と、IP の設定


▼osx の NFS Server 側

NFSの設定を入れて、nfsd を再起動。操作はroot でやっています。オンラインマニュアルはここ。

—- /etc/exports
/nfs/fedora22 -rw -mapall=root:wheel -network 192.168.1.0 -mask 255.255.255.0

exports ファイルがあればnfsd が起動しますが、手動で操作したい場合は

# nfsd start | stop

NFS で提供しているパスの確認。

# showmount -e localhost
Exports list on localhost:
/nfs/fedora22                       192.168.1.0
::

最初fedora22 入れようとして、失敗して、RASPIAN 入れたので名前があれですが。

それで、boot したい img をコピー。以下は、centos6.x で、osx の NFS をマウントして、rsync しています。centos6はバーチャルボックスでosx を同じネットワークセグメントにいます。

[root@cent66 etc]# df -hT
Filesystem                   Type     Size  Used Avail Use% Mounted on
::
hope.junkhack:/exports       nfs      466G  390G   76G  84% /nfs
hope.junkhack:/nfs/fedora22  nfs      466G  390G   76G  84% /mnt/fedora22

hope.junkhack は名前解決できるようにしてあります。ちなみに、fstab はこんな感じのデフォルト。

—- /etc/fstab
::
hope.junkhack:/exports    /nfs        nfs        defaults    0 0
hope.junkhack:/nfs/fedora22    /mnt/fedora22    nfs        defaults    0 0

で、RASPIAN のイメージをマウント。

[root@cent66 RASPBIAN]# kpartx -av 2015-05-05-raspbian-wheezy.img
add map loop0p1 (253:2): 0 114688 linear /dev/loop0 8192
add map loop0p2 (253:3): 0 6277120 linear /dev/loop0 122880

[root@cent66 RASPBIAN]# mount /dev/mapper/loop0p2 /mnt/raspi/

[root@cent66 RASPBIAN]# df -h
Filesystem                    Size  Used Avail Use% Mounted on
::
hope.junkhack:/exports        466G  388G   78G  84% /nfs
hope.junkhack:/nfs/fedora22   466G  388G   78G  84% /mnt/fedora22
/dev/mapper/loop0p2           3.0G  2.4G  451M  85% /mnt/raspi
[root@cent66 RASPBIAN]#

で、コピー。

[root@cent66 RASPBIAN]# rsync -av /mnt/raspi/ /mnt/fedora22/
sending incremental file list
./
bin/
bin/bash
bin/bunzip2

::

var/spool/cron/crontabs/
var/spool/rsyslog/
var/tmp/

sent 2304687346 bytes  received 1293752 bytes  4274293.05 bytes/sec
total size is 2299569061  speedup is 1.00
[root@cent66 RASPBIAN]#


で、NFS でブートするときに fstab の中がそのままだと、SD カードのパーティションをchroot してしまうのでコメントアウト。

[root@cent66 etc]# vim fstab

proc            /proc           proc    defaults          0       0
/dev/mmcblk0p1  /boot           vfat    defaults          0       2
#/dev/mmcblk0p2  /               ext4    defaults,noatime  0       1

NFS側のイメージ展開は以上で終わり。


▼Boot するcmdline.txt の中に以下を追加

root=/dev/nfs rootfstype=nfs nfsroot=192.168.1.17:/nfs/fedora22,udp,vers=3,nolock ip=192.168.1.24:192.168.1.17:192.168.1.1:255.255.255.0:rpi:eth0:off

nolock のオプションは必要ないかもしれません。とりあえず、これで動いてはいます。IPのところは以下の書式。

ip=<raspberrypi_ip>:<nfs_server_ip>:<default_gateway>:<mask>:rpi:eth0:off

シリアルコンソールのブートログは、

[    4.638898] smsc95xx 1-1.1:1.0 eth0: link up, 100Mbps, full-duplex, lpa 0xC5E1

[ 4.674857] IP-Config: Complete:

[ 4.680180] device=eth0, hwaddr=b8:27:eb:97:45:fb, ipaddr=192.168.1.24, mask=255.255.255.0, gw=192.168.1.1

[ 4.694694] host=rpi, domain=, nis-domain=(none)

[ 4.701878] bootserver=192.168.1.17, rootserver=192.168.1.17, rootpath=

[ 4.719859] VFS: Mounted root (nfs filesystem) readonly on device 0:14.

[ 4.729328] devtmpfs: mounted

[ 4.735147] Freeing unused kernel memory: 400K (80786000 - 807ea000)

[ 5.132474] random: nonblocking pool is initialized

[ 6.228285] udevd[177]: starting version 175

Raspbian GNU/Linux 7 pi ttyAMA0

pi login:

となっています。

NFS Boot させたあと、uname したら、

BerryBoot の kernel で起動してるってこと?

ここのところ、Fedora21 – 22 ばっかりを触っていまして、オフィシャルのRaspbian からちょっと離れていました。

で、Raspbian の image も BerryBoot 用に変換しようと思い、見てみると BerryBoot でインストールするオフィシャルの Raspbian は、2015 年の2 月に作成されています。


ん? これはちょっと古いやつですかね?オフィシャルの最新は、リリースノートを見ると、

http://downloads.raspberrypi.org/raspbian/release_notes.txt
2015-05-05:
  * Updated UI changes
  * Updated firmware
  * Install raspberrypi-net-mods
  * Install avahi-daemon
  * Add user pi to new i2c and spi groups
  * Modified udev rules for i2c and spi devices
2015-02-16:
  * Newer firmware with various fixes
  * New Sonic Pi release
  * Pi2 compatible RPi.GPIO
  * Updated Wolfram Mathematica
2015-01-31:
  * Support for Pi2
  * Newer firmware
  * New Sonic Pi release
  * Updated Scratch
  * New Wolfram Mathematica release
  * Updated Epiphany

::

とやっているようです。なので、変換してiscsi boot に入れてみました。いろんなバージョンを入れ替えできるので、便利です。(と、このときは思っていまいたが、、、)

img 変換の手順はメモしたのを見ながら、やればあんなに苦労したのに、あっさり。手順書っていうのは大切ですね。


恒例のUnixBench は以下のようでした。

========================================================================
   BYTE UNIX Benchmarks (Version 5.1.3)

   System: pi: GNU/Linux
   OS: GNU/Linux -- 3.18.10v7-aufs -- #1 SMP PREEMPT Wed Apr 1 00:07:44 CEST 2015
   Machine: armv7l (unknown)
   Language: en_US.utf8 (charmap="ANSI_X3.4-1968", collate="ANSI_X3.4-1968")
   CPU 0: ARMv7 Processor rev 5 (v7l) (0.0 bogomips)
          
   CPU 1: ARMv7 Processor rev 5 (v7l) (0.0 bogomips)
          
   CPU 2: ARMv7 Processor rev 5 (v7l) (0.0 bogomips)
          
   CPU 3: ARMv7 Processor rev 5 (v7l) (0.0 bogomips)
          
   20:41:56 up 7 min,  2 users,  load average: 0.61, 0.18, 0.07; runlevel 2

------------------------------------------------------------------------
Benchmark Run: 月  7月 20 2015 20:41:56 - 21:10:14
4 CPUs in system; running 1 parallel copy of tests

Dhrystone 2 using register variables        3316993.9 lps   (10.0 s, 7 samples)
Double-Precision Whetstone                      554.5 MWIPS (10.0 s, 7 samples)
Execl Throughput                                491.3 lps   (29.9 s, 2 samples)
File Copy 1024 bufsize 2000 maxblocks         49985.5 KBps  (30.0 s, 2 samples)
File Copy 256 bufsize 500 maxblocks           13538.4 KBps  (30.0 s, 2 samples)
File Copy 4096 bufsize 8000 maxblocks        149986.5 KBps  (30.0 s, 2 samples)
Pipe Throughput                              207549.3 lps   (10.0 s, 7 samples)
Pipe-based Context Switching                  37800.2 lps   (10.0 s, 7 samples)
Process Creation                               1425.8 lps   (30.0 s, 2 samples)
Shell Scripts (1 concurrent)                   1298.1 lpm   (60.0 s, 2 samples)
Shell Scripts (8 concurrent)                    332.3 lpm   (60.1 s, 2 samples)
System Call Overhead                         459612.1 lps   (10.0 s, 7 samples)

System Benchmarks Index Values               BASELINE       RESULT    INDEX
Dhrystone 2 using register variables         116700.0    3316993.9    284.2
Double-Precision Whetstone                       55.0        554.5    100.8
Execl Throughput                                 43.0        491.3    114.2
File Copy 1024 bufsize 2000 maxblocks          3960.0      49985.5    126.2
File Copy 256 bufsize 500 maxblocks            1655.0      13538.4     81.8
File Copy 4096 bufsize 8000 maxblocks          5800.0     149986.5    258.6
Pipe Throughput                               12440.0     207549.3    166.8
Pipe-based Context Switching                   4000.0      37800.2     94.5
Process Creation                                126.0       1425.8    113.2
Shell Scripts (1 concurrent)                     42.4       1298.1    306.1
Shell Scripts (8 concurrent)                      6.0        332.3    553.8
System Call Overhead                          15000.0     459612.1    306.4
                                                                   ========
System Benchmarks Index Score                                         174.7

------------------------------------------------------------------------
Benchmark Run: 月  7月 20 2015 21:10:14 - 21:39:00
4 CPUs in system; running 4 parallel copies of tests

Dhrystone 2 using register variables       12869914.9 lps   (10.0 s, 7 samples)
Double-Precision Whetstone                     2212.6 MWIPS (10.0 s, 7 samples)
Execl Throughput                               1143.7 lps   (29.9 s, 2 samples)
File Copy 1024 bufsize 2000 maxblocks         69133.5 KBps  (30.0 s, 2 samples)
File Copy 256 bufsize 500 maxblocks           18287.4 KBps  (30.0 s, 2 samples)
File Copy 4096 bufsize 8000 maxblocks        220513.0 KBps  (30.0 s, 2 samples)
Pipe Throughput                              802846.4 lps   (10.0 s, 7 samples)
Pipe-based Context Switching                 139871.0 lps   (10.0 s, 7 samples)
Process Creation                               3197.1 lps   (30.0 s, 2 samples)
Shell Scripts (1 concurrent)                   2636.1 lpm   (60.1 s, 2 samples)
Shell Scripts (8 concurrent)                    347.5 lpm   (60.3 s, 2 samples)
System Call Overhead                        1719885.8 lps   (10.0 s, 7 samples)

System Benchmarks Index Values               BASELINE       RESULT    INDEX
Dhrystone 2 using register variables         116700.0   12869914.9   1102.8
Double-Precision Whetstone                       55.0       2212.6    402.3
Execl Throughput                                 43.0       1143.7    266.0
File Copy 1024 bufsize 2000 maxblocks          3960.0      69133.5    174.6
File Copy 256 bufsize 500 maxblocks            1655.0      18287.4    110.5
File Copy 4096 bufsize 8000 maxblocks          5800.0     220513.0    380.2
Pipe Throughput                               12440.0     802846.4    645.4
Pipe-based Context Switching                   4000.0     139871.0    349.7
Process Creation                                126.0       3197.1    253.7
Shell Scripts (1 concurrent)                     42.4       2636.1    621.7
Shell Scripts (8 concurrent)                      6.0        347.5    579.2
System Call Overhead                          15000.0    1719885.8   1146.6
                                                                   ========
System Benchmarks Index Score                                         406.7


まぁ、OS が変わったからといって劇的に変化があるわけじゃないんですが。

CPUのFREQは、

root@pi:~# cat /sys/devices/system/cpu/cpu0/cpufreq/scaling_cur_freq

1000000★

root@pi:~# uname -a

Linux pi 3.18.10v7-aufs #1 SMP PREEMPT Wed Apr 1 00:07:44 CEST 2015 armv7l GNU/Linux

root@pi:~#

ん? 今気が付いたんですが、kernel が、BerryBoot のaufs のなんですが?

root@pi:/mnt# lsmod

Module                  Size  Used by

cfg80211              366024  0

rfkill                 14438  1 cfg80211

snd_bcm2835            17419  0

snd_pcm                68808  1 snd_bcm2835

snd_seq                49800  0

snd_seq_device          4906  1 snd_seq

snd_timer              16630  2 snd_pcm,snd_seq

snd                    47011  5 snd_bcm2835,snd_timer,snd_pcm,snd_seq,snd_seq_device

evdev                   9303  2

joydev                  8397  0

uio_pdrv_genirq         2865  0

uio                     7319  1 uio_pdrv_genirq

iscsi_tcp               8496  2

libiscsi_tcp           11808  1 iscsi_tcp

libiscsi               33727  2 libiscsi_tcp,iscsi_tcp

root@pi:/mnt#

root@pi:/mnt#

root@pi:/mnt# cat /proc/modules

cfg80211 366024 0 – Live 0x7f095000

rfkill 14438 1 cfg80211, Live 0x7f08d000

snd_bcm2835 17419 0 – Live 0x7f084000

snd_pcm 68808 1 snd_bcm2835, Live 0x7f06b000

snd_seq 49800 0 – Live 0x7f058000

snd_seq_device 4906 1 snd_seq, Live 0x7f053000

snd_timer 16630 2 snd_pcm,snd_seq, Live 0x7f04a000

snd 47011 5 snd_bcm2835,snd_pcm,snd_seq,snd_seq_device,snd_timer, Live 0x7f037000

evdev 9303 2 – Live 0x7f02b000

joydev 8397 0 – Live 0x7f025000

uio_pdrv_genirq 2865 0 – Live 0x7f021000

uio 7319 1 uio_pdrv_genirq, Live 0x7f01c000

iscsi_tcp 8496 2 – Live 0x7f015000

libiscsi_tcp 11808 1 iscsi_tcp, Live 0x7f00e000

libiscsi 33727 2 iscsi_tcp,libiscsi_tcp, Live 0x7f000000

root@pi:/mnt#

uBoot で BerryBoot のiSCSIが有効になっているカーネルからchrootするときにこれって変えれるんだろうか?

FATフォーマットのconfig.txt は次のようになっています。

disable_overscan=1

start_x=1

gpu_mem=128

# Berryboot settings, do not change

initramfs berryboot.img

[pi2]

kernel=kernel_rpi2_aufs.img

arm_freq_min=900

arm_freq=1000

core_freq_min=450

core_freq=500

sdram_freq=500

over_voltage=2

[pi1]

kernel=kernel_rpi_aufs.img

cma_lwm=16

cma_hwm=32

cma_offline_start=16

起動しているカーネルは、kernel_rpi2_aufs.img っていうことですね。そのカーネルからルートファイルシステムにchroot する感じだと思うのですが、img 作るときに、/lib/modules/ 配下を入れていないので、こうなるんですかね?

kernel_rpi2_aufs.img の中がどうなっているのか気になりますね。そもそも、raspai がブートする仕組みっていうのがどうゆう流れになっているかを把握しないとだめですね。