ESP12単体で湿度温度照度のIoTデバイス

前回は、Arduino Nano でDHT22の湿度と、温度をゲットしていました。


編集後記

その後、リチウム電池と組みあわせ、IoT デバイスを作った記事がこちら
初めてのIoTデバイス完成

image


IoTデバイスとしてデータを投げつけたいので、ESP12、単体でコーディングしました。こんな感じで、前回作成したものに、付け加える感じでとりあえずテスト。

写真 1


コードは、以下のようにしました。アクセスポイントや、ThingSpeak の書き込みAPI key などはほどよく書き換えてください。

ポイントは、DHT のライブラリを初期化するときの第3のパラメータで、いろいろ試した結果、15だとうまく値が取れるようです。まだ、この値はよくわかっていませんが、CPU Clock に対応する値のようで、Arduino とかは、16Mhz のはデフォルトで、Arduino Due とか 84mhz は、30 にせよとのこと。


この値は、以下のコードを見てみると、ESP01 は 11 で動作するようです。

https://learn.adafruit.com/esp8266-temperature-slash-humidity-webserver/code

// Initialize DHT sensor
// NOTE: For working with a faster than ATmega328p 16 MHz Arduino chip, like an ESP8266,
// you need to increase the threshold for cycle counts considered a 1 or 0.
// You can do this by passing a 3rd parameter for this threshold.  It’s a bit
// of fiddling to find the right value, but in general the faster the CPU the
// higher the value.  The default for a 16mhz AVR is a value of 6.  For an
// Arduino Due that runs at 84mhz a value of 30 works.
// This is for the ESP8266 processor on ESP-01
DHT dht(DHTPIN, DHTTYPE, 11); // 11 works fine for ESP8266

ESP12 では、11 だと値がおかしくなり、15 だとうまく取れました。あと、IDE は、arduino 1.6.4 以上で今回は Hourly Build  を使いました。Boards Manager という機能が加わり、ツールメニューのボードからインストールできます。

手動で入れてもいいんですが、まぁ便利な機能がつきましたね。

http://arduino.esp8266.com/package_esp8266com_index.json


/
ESP8266 HTTP get webclient.
ADC Read (ESP12 + Light(CdS GL5528)) + DHT22(AM2302) 1-Wire
https://thingspeak.com/channels/42239
Arduino IDE 1.6.5 Hourly Build 2015/06/12 03:13
esp8266 by ESP8266 Community version 1.6.4-673-g8cd3697
JunkHack 2015.06.15
/

include <ESP8266WiFi.h>

include <DHT.h>

define DHTPIN 4

define DHTTYPE DHT22

DHT dht(DHTPIN, DHTTYPE, 15);

const char ssid = "JunkHack"; const char password = "testtest";

const char* host = "184.106.153.149";

int WiFiConLed = 13;// WEB Connect int WEBconLed = 0; // WiFi Connect

void setup() { dht.begin();

pinMode(WiFiConLed, OUTPUT); pinMode(WEBconLed, OUTPUT); Serial.begin(115200); delay(10);

// We start by connecting to a WiFi network

Serial.println(); Serial.println(); Serial.print("Connecting to "); Serial.println(ssid);

WiFi.begin(ssid, password);

while (WiFi.status() != WL_CONNECTED) { delay(500); Serial.print("."); digitalWrite(WiFiConLed, HIGH); delay(400); digitalWrite(WiFiConLed, LOW); delay(100); }

Serial.println(""); Serial.println("WiFi connected"); Serial.println("IP address: "); Serial.println(WiFi.localIP());

Serial.println("DHT22 AM2302 test!"); }

int value = 0; int count = 0; int adc = 0; float h = 0; float t = 0;

void loop() { delay(10000); // 10 sec ++value;

Serial.print("connecting to "); Serial.println(host);

// Use WiFiClient class to create TCP connections WiFiClient client; const int httpPort = 80; if (!client.connect(host, httpPort)) { Serial.println("connection failed"); return; }

digitalWrite(WEBconLed, HIGH); delay(1000); count += 1;

Serial.print("ADC: "); adc = analogRead(A0); Serial.println(adc);

float h = dht.readHumidity(); float t = dht.readTemperature();

if (isnan(h) || isnan(t) ) { Serial.println("Failed to read from DHT sensor!"); return; }

Serial.print("Humidity: "); Serial.print(h); Serial.print(" %\t"); Serial.print("Temperature: "); Serial.print(t); Serial.println(" *C ");

// We now create a URI for the request String url = "/update?key=33HJNSWFZ8EZAXD6&field1="; url += adc; url += "&field2="; url += h; url += "&field3="; url += t;

Serial.print("Requesting URL: "); Serial.println(url);

// This will send the request to the server client.print(String("GET ") + url + " HTTP/1.1\r\n" + "Host: " + host + "\r\n" + "Connection: close\r\n\r\n"); delay(10);

// Read all the lines of the reply from server and print them to Serial while(client.available()){ String line = client.readStringUntil('\r'); Serial.print(line); }

// Close connection Serial.println(); Serial.println("closing connection"); digitalWrite(WEBconLed, LOW); }


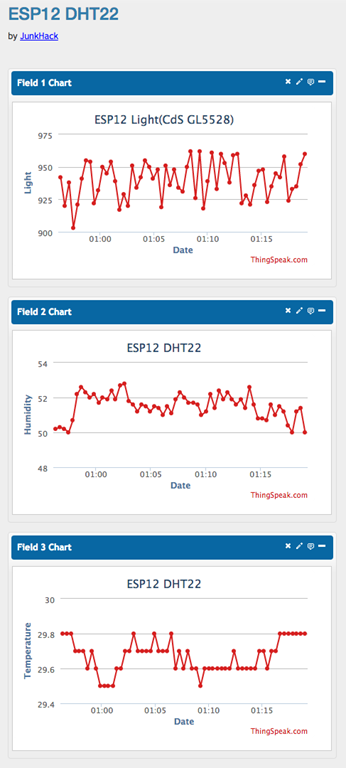
データは、とまっているときもあるかもですが、以下で見れます。


https://thingspeak.com/channels/42239


2015-06-15 1.19.12


部屋の温度がそこそこ高いので、実際に温度計を見てみましたところ、ほぼ適正な値でした。部屋暑すぎ。

写真 2


これで、明るさ、温度、湿度が取れました。まだ、GPIO Pin があまっているので、気圧や、雨量、風向、風量など取ろうと思えば可能ですね。また、課題となるのは、電源です。結構シビアに電源品質が問われるようで、ぼろい電源だと途中で止まります。


あと、sleep mode にして平常時に、パワーを抑えるように制御する必要があります。


まだ、課題はありますね。
AM2302温度湿度センサーをArduino Nanoでテスト

温度と湿度のセンサーが合体したので、単線で使えるものを探していたら、DHTシリーズというのがあったので、これをテスト。

メーカーは、Aosong Guangzhou Electronics Co., Ltd.で、中国の広州にあるセンサー専門メーカーのようです。1個2.99 ドルで、Nanoよりも高いです。そこそこ、精度は取れるのでしょうかね。


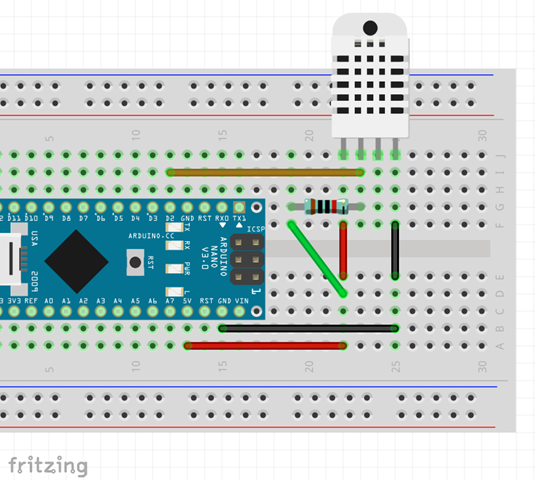
DHT22_AM2302_fzz

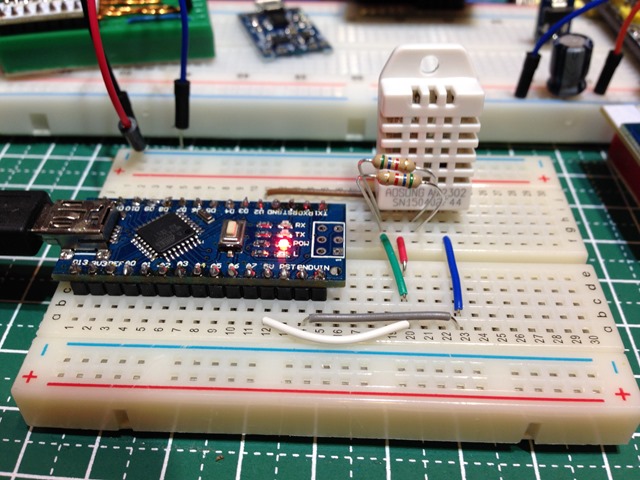
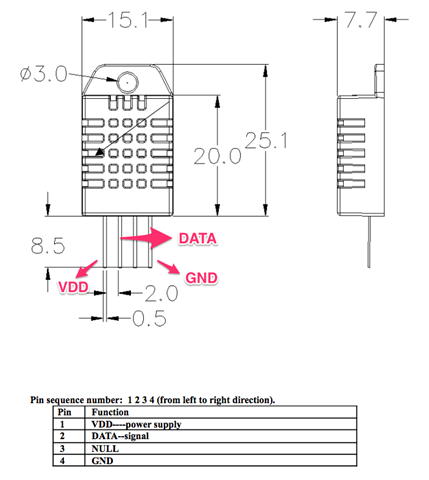
手持ちに10KΩが見当たらなかったので、5.6K を2つ付けています。センサーからは4Pin 出ていますが、使うのは3本です。

AM2302


https://www.sparkfun.com/datasheets/Sensors/Temperature/DHT22.pdf

3. Technical Specification:
Model DHT22
Power supply 3.3-6V DC
Output signal digital signal via single-bus
Sensing element Polymer capacitor
Operating range humidity 0-100%RH; temperature -40~80Celsius
Accuracy humidity +-2%RH(Max +-5%RH); temperature <+-0.5Celsius
Resolution or sensitivity humidity 0.1%RH; temperature 0.1Celsius
Repeatability humidity +-1%RH; temperature +-0.2Celsius
Humidity hysteresis +-0.3%RH
Long-term Stability +-0.5%RH/year
Sensing period Average: 2s
Interchangeability fully interchangeable
Dimensions small size 14185.5mm; big size 22285mm


datasheets_Sensors_Temperature_DHT22_pdf

コートは、サンプルのです。華氏でシリアルプリントしている部分はいらないので、以下のようにしました。

ライブラリは、以下を使いました。

— Arduino library for DHT11DHT22 —
https://github.com/adafruit/DHT-sensor-library


/*
AM2302 DHT22 humidity/temperature sensors
Read test.

--- AM2302 Aosong Guangzhou Electronics Co., Ltd. --- 3 to 5V power and I/O 2.5mA max current use during conversion (while requesting data) Good for 0-100% humidity readings with 2-5% accuracy Good for -40 to 125°C temperature readings ±0.5°C accuracy No more than 0.5 Hz sampling rate (once every 2 seconds) Body size 15.1mm x 25mm x 7.7mm 4 pins with 0.1" spacing

--- Arduino library for DHT11DHT22 --- https://github.com/adafruit/DHT-sensor-library

JunkHack 2015.06.14 */

include "DHT.h"

define DHTPIN 2 // what pin we're connected to

// Uncomment whatever type you're using! //#define DHTTYPE DHT11 // DHT 11

define DHTTYPE DHT22 // DHT 22 (AM2302)

//#define DHTTYPE DHT21 // DHT 21 (AM2301)

// Initialize DHT sensor for normal 16mhz Arduino DHT dht(DHTPIN, DHTTYPE);

void setup() { Serial.begin(9600); Serial.println("DHT22 AM2302 test!");

dht.begin(); }

void loop() { // Wait a few seconds between measurements. delay(2000);

// Reading temperature or humidity takes about 250 milliseconds! // Sensor readings may also be up to 2 seconds 'old' (its a very slow sensor) float h = dht.readHumidity(); // Read temperature as Celsius float t = dht.readTemperature(); // Read temperature as Fahrenheit float f = dht.readTemperature(true);

// Check if any reads failed and exit early (to try again). if (isnan(h) || isnan(t) || isnan(f)) { Serial.println("Failed to read from DHT sensor!"); return; }

// Compute heat index // Must send in temp in Fahrenheit! float hi = dht.computeHeatIndex(f, h);

Serial.print("Humidity: "); Serial.print(h); Serial.print(" %\t"); Serial.print("Temperature: "); Serial.print(t); Serial.println(" *C "); }

梅雨時なので、湿度が高いかしらね。温度は、常夏の気温ですが。暑すぎない?

まぁ、こんな感じで湿度と、温度がとられていますね。

DTR付のCP2102 をゲット

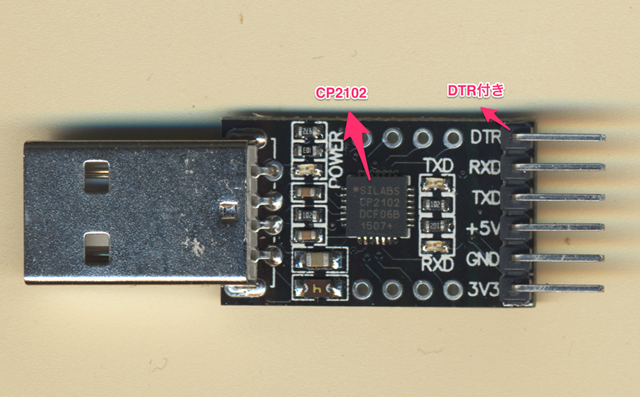
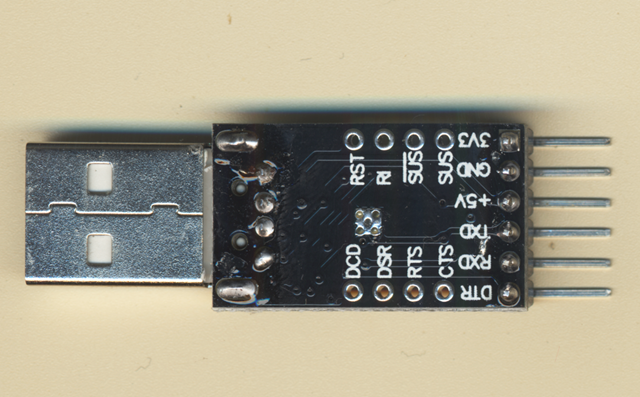
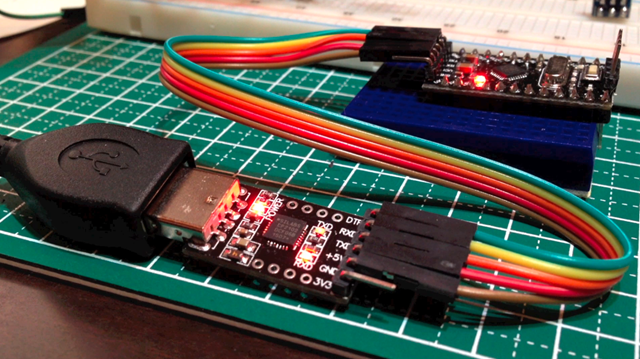
お買い物ついでに、忘れないようDTR付のUSBシリアル変換をゲットしました。

cp2102a

動作確認してみました。

cp2102b

いやぁ、便利ですね。

スクリーンショット_2015_05_17_0_58

前のCP2102 は ESP8266 用にしてこっちは、ProMini用にします。

cp2102

映像はこちら。

[youtube https://www.youtube.com/watch?v=xDVnZ8GZNqc]

5V 18650 リチウムバッテリー充電モジュール

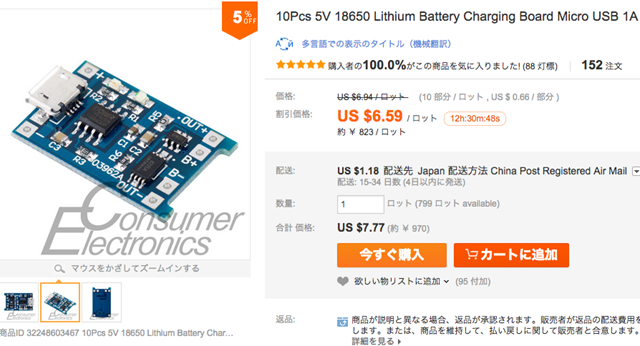
今までで最速で届いた、パーツです。5/1 に発注して9日に到着。このストアはすごくいいですね。

10個で買ったので、1個あたり97円です。

32248603467

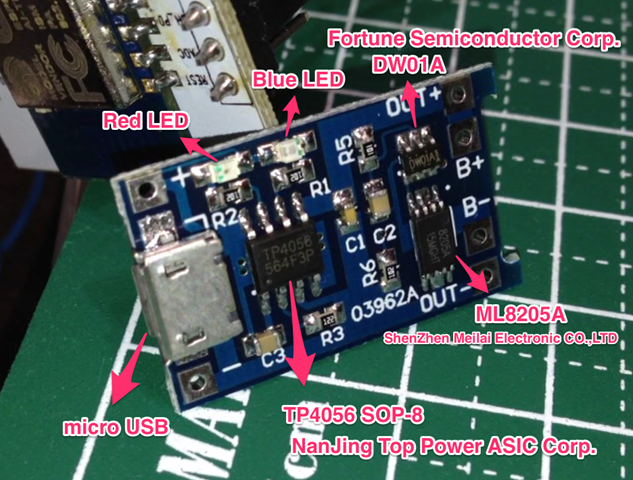
保護回路付で、よくできています。

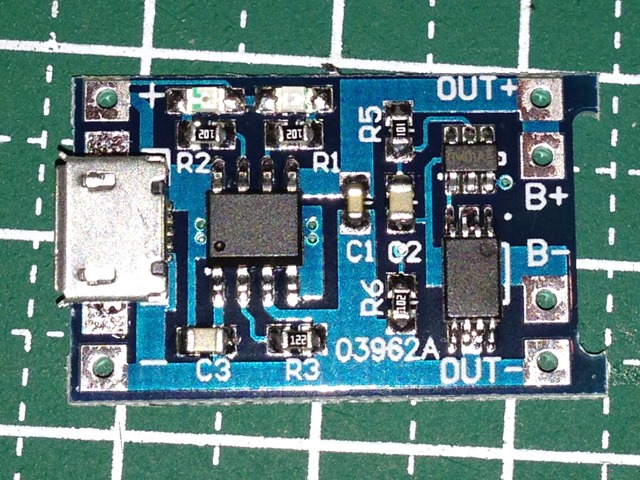
メインのIDは、TP4056 でNanJing Top Power ASIC Corp製。保護回路に、DW01A と ML8205A が乗っています。


TP4056.pdf

http://dlnmh9ip6v2uc.cloudfront.net/datasheets/Prototyping/TP4056.pdf


DW01x-DS-17_EN.pdf

http://www.ic-fortune.com/upload/Download/DW01x-DS-17_EN.pdf


ML8205A

http://www.datasheet4u.com/datasheet/M/L/8/ML8205A-MEILAI.pdf.html


2015_05_10_2_14

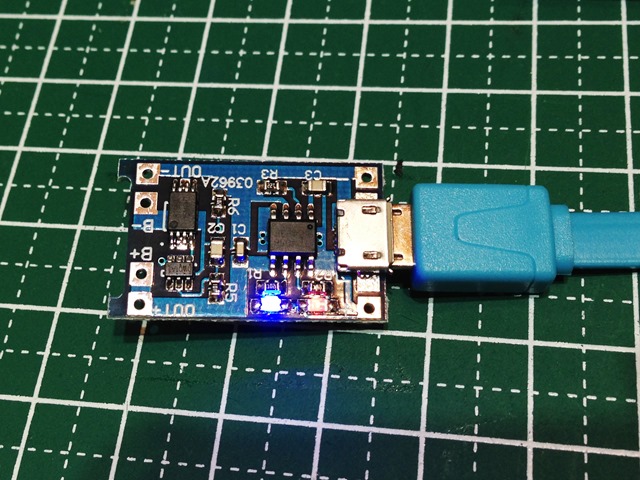
マイクロUSBから給電すると、ブルーLEDがつきます。電池がないと赤LEDは点滅する感じ。

IMG_0275

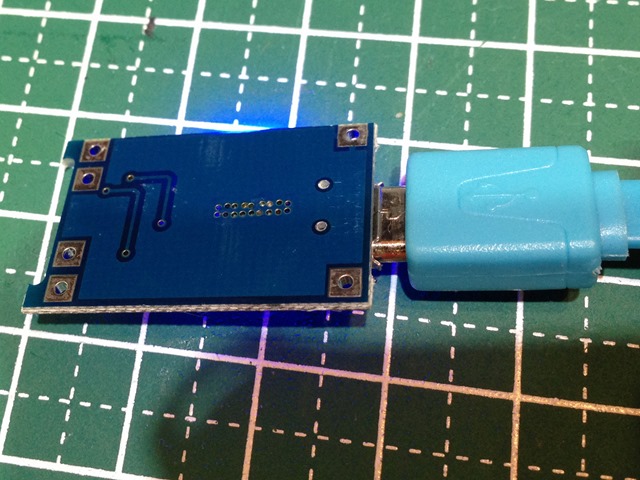
OUT側の内側は、バッテリーへ。OUT+- は出力へ。

IMG_0276 IMG_0277 

ジュリアンさんの解説映像がわかりやすいです。発音もいいですしね。

[youtube https://www.youtube.com/watch?v=Qw4psECqpwI]

IoTデバイス用にと思っていますが、まだ電池ボックスがないんですよね。あぁ、3Dプリンターがほしいぃ。

ESP12単体で光センサーアナログ読み

Aliexpress経由で購入した素材で遊びました。

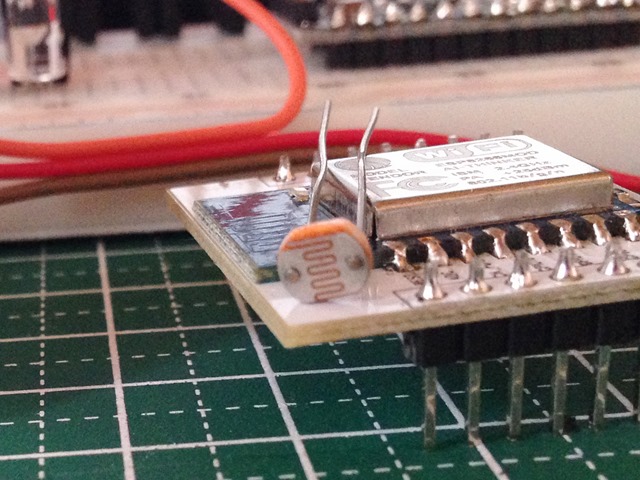
20個で、98円のGL5528光センサーをつけてみました。

IMG_0269

20個で98円ということは、1個あたり約5円ですね。

esp12-cde_fzz_-_Fritzing_-__ブレッドボード_ビュー_

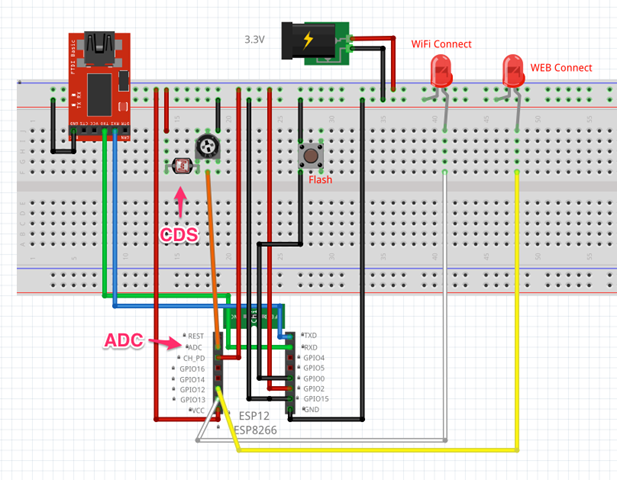
ADC にこんな感じでつけてみました。

当初ADC Pinにつけても値が拾えず、抵抗値を可変で調整したらうまく値が取れました。このADC-GND間の電圧は、強い光を当てた状態で約1.13Vくらいです。夜、電気をつけた状態で0.98Vくらい。手で覆うと0.6Vくらいになる感じです。


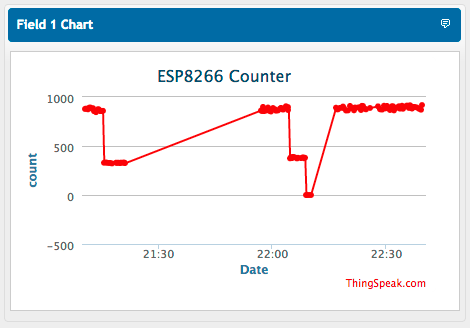
コードは以下のようです。エラー処理が抜けているのか、バグがあるのかわかりませんがちょっと不安定です。

/*
 ESP8266 HTTP get webclient.
 ADC Read test.
 https://thingspeak.com/channels/37124
 Arduino-compatible IDE with ESP8266
 arduino-1.6.1-macosx-java-latest-signed.zip
 https://github.com/esp8266/Arduino
 JunkHack 2015.05.09
 */
 
#include <ESP8266WiFi.h>
 
const char* ssid     = "JunkHack";
const char* password = "testtest";
 
const char* host = "184.106.153.149";

int WiFiConLed = 13;
int WEBconLed = 12;

void setup() {
  pinMode(WiFiConLed, OUTPUT);
  pinMode(WEBconLed, OUTPUT);
  Serial.begin(115200);
  delay(10);
 
  // We start by connecting to a WiFi network
 
  Serial.println();
  Serial.println();
  Serial.print("Connecting to ");
  Serial.println(ssid);
 
  WiFi.begin(ssid, password);
 
  while (WiFi.status() != WL_CONNECTED) {
    delay(500);
    Serial.print(".");
    digitalWrite(WiFiConLed, HIGH);
    delay(400);
    digitalWrite(WiFiConLed, LOW);
    delay(100);
  }
 
  Serial.println("");
  Serial.println("WiFi connected");
  Serial.println("IP address: ");
  Serial.println(WiFi.localIP());
}
 
int value = 0;
int count = 0;
int adc = 0;

void loop() {
  delay(5000);
  ++value;
 
  Serial.print("connecting to ");
  Serial.println(host);
 
  // Use WiFiClient class to create TCP connections
  WiFiClient client;
  const int httpPort = 80;
  if (!client.connect(host, httpPort)) {
    Serial.println("connection failed");
    return;
  }
  
  digitalWrite(WEBconLed, HIGH);
  delay(1000);
  count += 1;

  Serial.print("ADC: ");
  adc = analogRead(A0);
  Serial.println(adc);
 
  // We now create a URI for the request
  String url = "/update?key=5GPL7J7EVNB5R8GE&field1=";
  url += adc;
  Serial.print("Requesting URL: ");
  Serial.println(url);
 
  // This will send the request to the server
  client.print(String("GET ") + url + " HTTP/1.1\r\n" +
               "Host: " + host + "\r\n" +
               "Connection: close\r\n\r\n");
  delay(10);
 
  // Read all the lines of the reply from server and print them to Serial
  while(client.available()){
    String line = client.readStringUntil('\r');
    Serial.print(line);
  }
 
  // Close connection
  Serial.println();
  Serial.println("closing connection");
  digitalWrite(WEBconLed, LOW);
}


とりあえず、こんな感じで、データが投げられています。

ESP12_-_ThingSpeak