前回は、Arduino Nano でDHT22の湿度と、温度をゲットしていました。
編集後記
その後、リチウム電池と組みあわせ、IoT デバイスを作った記事がこちら
初めてのIoTデバイス完成

IoTデバイスとしてデータを投げつけたいので、ESP12、単体でコーディングしました。こんな感じで、前回作成したものに、付け加える感じでとりあえずテスト。

コードは、以下のようにしました。アクセスポイントや、ThingSpeak の書き込みAPI key などはほどよく書き換えてください。
ポイントは、DHT のライブラリを初期化するときの第3のパラメータで、いろいろ試した結果、15だとうまく値が取れるようです。まだ、この値はよくわかっていませんが、CPU Clock に対応する値のようで、Arduino とかは、16Mhz のはデフォルトで、Arduino Due とか 84mhz は、30 にせよとのこと。
この値は、以下のコードを見てみると、ESP01 は 11 で動作するようです。
https://learn.adafruit.com/esp8266-temperature-slash-humidity-webserver/code
// Initialize DHT sensor
// NOTE: For working with a faster than ATmega328p 16 MHz Arduino chip, like an ESP8266,
// you need to increase the threshold for cycle counts considered a 1 or 0.
// You can do this by passing a 3rd parameter for this threshold. It’s a bit
// of fiddling to find the right value, but in general the faster the CPU the
// higher the value. The default for a 16mhz AVR is a value of 6. For an
// Arduino Due that runs at 84mhz a value of 30 works.
// This is for the ESP8266 processor on ESP-01
DHT dht(DHTPIN, DHTTYPE, 11); // 11 works fine for ESP8266
ESP12 では、11 だと値がおかしくなり、15 だとうまく取れました。あと、IDE は、arduino 1.6.4 以上で今回は Hourly Build を使いました。Boards Manager という機能が加わり、ツールメニューのボードからインストールできます。
手動で入れてもいいんですが、まぁ便利な機能がつきましたね。
/ ESP8266 HTTP get webclient. ADC Read (ESP12 + Light(CdS GL5528)) + DHT22(AM2302) 1-Wire https://thingspeak.com/channels/42239 Arduino IDE 1.6.5 Hourly Build 2015/06/12 03:13 esp8266 by ESP8266 Community version 1.6.4-673-g8cd3697 JunkHack 2015.06.15 /include <ESP8266WiFi.h>
include <DHT.h>
define DHTPIN 4
define DHTTYPE DHT22
DHT dht(DHTPIN, DHTTYPE, 15);
const char ssid = "JunkHack"; const char password = "testtest";
const char* host = "184.106.153.149";
int WiFiConLed = 13;// WEB Connect int WEBconLed = 0; // WiFi Connect
void setup() { dht.begin();
pinMode(WiFiConLed, OUTPUT); pinMode(WEBconLed, OUTPUT); Serial.begin(115200); delay(10);
// We start by connecting to a WiFi network
Serial.println(); Serial.println(); Serial.print("Connecting to "); Serial.println(ssid);
WiFi.begin(ssid, password);
while (WiFi.status() != WL_CONNECTED) { delay(500); Serial.print("."); digitalWrite(WiFiConLed, HIGH); delay(400); digitalWrite(WiFiConLed, LOW); delay(100); }
Serial.println(""); Serial.println("WiFi connected"); Serial.println("IP address: "); Serial.println(WiFi.localIP());
Serial.println("DHT22 AM2302 test!"); }
int value = 0; int count = 0; int adc = 0; float h = 0; float t = 0;
void loop() { delay(10000); // 10 sec ++value;
Serial.print("connecting to "); Serial.println(host);
// Use WiFiClient class to create TCP connections WiFiClient client; const int httpPort = 80; if (!client.connect(host, httpPort)) { Serial.println("connection failed"); return; }
digitalWrite(WEBconLed, HIGH); delay(1000); count += 1;
Serial.print("ADC: "); adc = analogRead(A0); Serial.println(adc);
float h = dht.readHumidity(); float t = dht.readTemperature();
if (isnan(h) || isnan(t) ) { Serial.println("Failed to read from DHT sensor!"); return; }
Serial.print("Humidity: "); Serial.print(h); Serial.print(" %\t"); Serial.print("Temperature: "); Serial.print(t); Serial.println(" *C ");
// We now create a URI for the request String url = "/update?key=33HJNSWFZ8EZAXD6&field1="; url += adc; url += "&field2="; url += h; url += "&field3="; url += t;
Serial.print("Requesting URL: "); Serial.println(url);
// This will send the request to the server client.print(String("GET ") + url + " HTTP/1.1\r\n" + "Host: " + host + "\r\n" + "Connection: close\r\n\r\n"); delay(10);
// Read all the lines of the reply from server and print them to Serial while(client.available()){ String line = client.readStringUntil('\r'); Serial.print(line); }
// Close connection Serial.println(); Serial.println("closing connection"); digitalWrite(WEBconLed, LOW); }
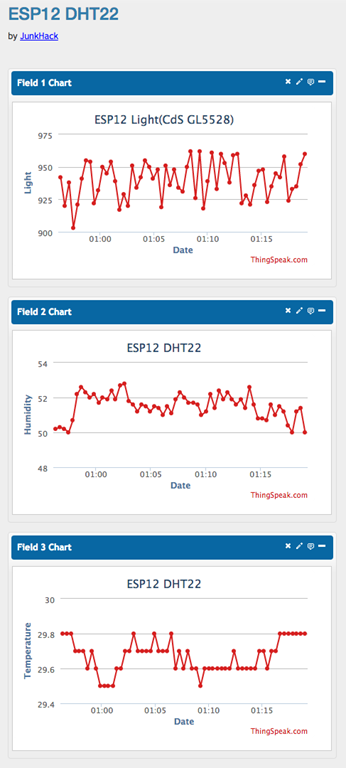
データは、とまっているときもあるかもですが、以下で見れます。
https://thingspeak.com/channels/42239
部屋の温度がそこそこ高いので、実際に温度計を見てみましたところ、ほぼ適正な値でした。部屋暑すぎ。

これで、明るさ、温度、湿度が取れました。まだ、GPIO Pin があまっているので、気圧や、雨量、風向、風量など取ろうと思えば可能ですね。また、課題となるのは、電源です。結構シビアに電源品質が問われるようで、ぼろい電源だと途中で止まります。
あと、sleep mode にして平常時に、パワーを抑えるように制御する必要があります。
まだ、課題はありますね。

ピンバック: 初めてのIoTデバイス完成 | junkhack
ピンバック: ESP8266 でADC 増設その3 | junkhack